Pages

Friday, May 31, 2013

June Stamp-of-the-Month Blog Hop

I'm back for another SOTM blog hop!  It looks like you've hopped from one Krista to another!  If you arrived from Krista's Krafty Korner, you're on the right track.  Just keep clicking until you get back to where you started.

This month's stamp set is so sweet and I love that the images are made for colouring in.  (Wow, that feels strange to type.  I wouldn't have said that a while ago!  I'm loving our alcohol markers and discovering the fun of colouring again.)  Here is what the stamp set looks like:


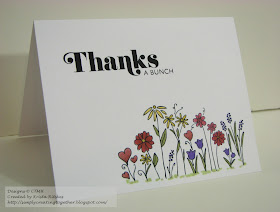
Isn't it sweet?  And those are Cricut Artiste images with the red line.  I'm all about the simple, as you probably already know and I wanted to colour, so here is what I came up with.


These two cards look identical, but they're not.  I wanted to experiment a bit.  For the card above I embossed the flower image with black embossing powder and for the one below, I stamped it with Memento Tuxedo Black ink.  The sentiment is stamped in CTMH Archival Black so it really pops.


Can you see the difference?  I think I like the bottom one better.  What about you?
Here is what I used for these two cards:


Your next stop on the hop is Lisa.  Head on over and check out what she's created for your inspiration.

Happy Creating!


Monday, May 27, 2013

Atlantic Hearths Sketch Challenge: Sketch #5


Welcome to another week of the Atlantic Hearts Sketch Challenge!  Here is the sketch for this week:

As soon as I saw this sketch, I knew I wanted to try a starburst.  I've seen so many of them in artwork lately, but wasn't sure how to make one.  So, I turned to Susan Williams.  She's new to blogging, but already has some great tutorials and is an amazing artist.  You've got to check her out!  Here's a link to her tutorial.

And here's the card I made:


I used Dream Pop, because you can still get it for a few more days, and well, I just love it!!  Here is my supply list.  The sentiment is from the Celebrations stamp set from the Art Philosophy Collection.


I'd love to see your artwork with this sketch.  Create a card and make sure to link it up here.  You could make the top 3!  Happy Creating!

Friday, May 24, 2013

Special Promotion: Oklahoma Relief

Can I just say ... I LOVE Close To My Heart!  Jeanette Lynton and her team have such big hearts.  I found out yesterday that they quickly threw together a special promotion to help raise money for the Red Cross in support of Oklahoma tornado victims.  This is a pre-release stamp set, from the 2013 Autumn/Winter Idea Book.


From now until June 30, you can order this little cutie for just $2.95.  100% of the profits will go to the Red Cross.  This sort of thing just makes my heart happy.  I feel so blessed to be a part of a company that does things like this.

I will be placing an order on Monday or Tuesday, so if you'd like to get one of these stamp sets, let me know by then.  Or, you can go directly to my website and order one for yourself and a friend and a neighbour and your mom and your sister and ...  :)

Tuesday, May 21, 2013

Atlantic Hearts Sketch #4: Dream Pop Card

Welcome to another Atlantic Hearts Sketch Challenge!  Here is the sketch:


Here is the card I made:


And I just had to show you a close up of that embossed cardstock.  LOVE it!


I just had to use the Dream Pop paper that is only available this month!  It's so fun and bright and full of inspiration.  I am loving working with it.  

Here is what I used for my card:


Head on over to Atlantic Hearts to see the rest of the design team's creations and then get crafting.

Happy Creating!


Thursday, May 16, 2013

Giveaway Winners!

It's time to announce some winners!


Congratulations to Joanne, Michelle and Karen for winning the Card Kit and Soil Sample Giveaway!  Watch your email for a note from me.  Don't forget, if you create a sprouting card with the kit I will showcase it here on my blog.

Tuesday, May 14, 2013

Atlantic Hearts Sketches #3!


Welcome to my first post as an Atlantic Hearts design team member!  I'm so excited to be a part of a design team and since I love working from sketches, this is perfect.  Here is the sketch for this week:


I loved this sketch.  My brain was full of great ideas right away.  If you follow my blog at all, you'll be aware that I love to do projects that don't necessarily take a lot of time but still look great.  I actually contemplated turning this sketch around or flipping it, but I ended up following it pretty closely.  Here's my card:


I went waaaaay back for the paper on this card.  All this paper is from a reeeeeally old paper pack called Whoops-a-Daisy.  It's got some super bright colours that are all retired now.  In fact, even the stamp set I used, Say It In Style, is retired but it's one I go to often.  I edged everything with White Daisy pigment ink and stamped the sentiment in the same ink.

Here are the current products I used:


Now, go to Atlantic Hearts, check out the other projects and make a card (or other project) of your own.

Happy Creating!

Monday, May 13, 2013

It's a Pajama Party! CTMH and Big Picture Classes team up.


Close To My Heart is teaming up with Big Picture Classes to bring you a live webcast with step-by-step instructions for making this Happy Thoughts kraft container. The FREE webcast will air Thursday, May 30 from 7:00 pm to 8:00 pm (MDT), 9pm EST. During the presentation, you’ll learn to make several projects from a variety of sponsors, including Close To My Heart’s Happy Thoughts kraft container, as the presenter walks you through the steps. Watch the Pajama Party by yourself, or with your crafting buddies for a fun crafting pajama party. Anyone with an Internet connection can watch, so be sure to order your project supplies in advance and then tune in!
The Pajama Party class will be available for FREE at BigPictureClasses.com on May 30. If you would like to interact on the message board, participate in live chat, post to the gallery, download handouts, or enter any contests, you will need to log in to the Pajama Party “classroom” by creating a free account on the Big Picture Classes website.
To make our Happy Thoughts kraft container, you will want to have the following items—or similar products—on hand:
  • My Acrylix® Frame Flair Stamp Set (D1546)
  • My Acrylix® Happy Thoughts Stamp Set (C1536)
  • Chantilly Paper Packet (need 1 sheet of pattern paper, X7163B)
  • Crème Brulee Cardstock (need 1 sheet, X5754)
  • Lagoon Cardstock (need 1 sheet, X5762)
  • White Daisy Cardstock (need 1 sheet, 1385)
  • Whisper Cardstock (need 1 sheet, X5929)
  • Whisper Exclusive Inks® Pad (Z2172)
  • Lagoon Exclusive Inks® Pad (Z2195)
  • My Creations® Kraft Container (Z1833)
  • Baker’s Twine Neutral Assortment (need 3 yards, Z1701)
  • Color-Ready Trinkets Wooden Shapes (Z1844)
  • Sparkles Black & Grey Assortment (Z1754)
  • 3-D Foam Tape (Z1151)
  • Micro-Tip Scissors (Z534)
  • Corner Rounder (Z1912)
  • Paper Trimmer (Z1783)
  • My Acrylix® Spritz Cleaner (1778)
  • My Acrylix® Stamp Scrubber (Z1782)
  • 2" × 3½" My Acrylix® Block (Y1009)
  • 4" × 5" My Acrylix® Block (Y1012)
  • Cricut® Art Philosophy Collection (Z1790)

To order these products, go to my website  and join the Pajama Party order.  This order will close on May 16 to ensure plenty of time to get your supplies in time for the Party on May 30 at 9pm.

Happy Creating!

Wednesday, May 8, 2013

Guest Post: Gardening Tips with Susan

So I lied, this wasn't my next post.  I forgot about the Atlantic Hearts Sketch Challenge post.  (sheepish grin here)  But I'm happy to announce that I made their design team!!!  My first time being on a design team.  Watch for my posts on their sketch challenges every Wednesday.

On to the soil-and-garden fun!

Here's what my tulip card looks like, now that it's been two weeks.


My kids are having SO MUCH FUN watching my seeds grow!!! Can't wait to see those Shasta Daisies blooming!  Don't worry, I'll post updates every so often.

Here they are, some great gardening tips from Susan of Pefferlaw.

Gardening with Children – Go simple

I would recommend having your children get involved with planting seeds outdoors this season.  Starting certain seeds indoors is a must in some regions, but can be a challenge when it comes to germinating and having enough light.  In the spirit of having a successful season with your child – plant outdoors when all chance of frost has passed.  I recommend Pefferlaw Soils due to their Certification for use in Organic Gardening; it guarantees the soil to be free of contaminants such as industrial waste or growth hormones.  It also grows great plants.  For further information visit the blogs on growth trials done at Guelph University -http://www.pefferlaw.com/blog/97-our-very-first-blog-ever

To plan for success-
1.       Help choose the area to plant the garden or place the pots- monitor to see how much sun / shade occurs during the day.  Give ownership of the space and project to your child.

2.        Select seeds that germinate quickly, that have their interest and match the sun conditions of the area.  Good choices might be: Marigolds, Carrots, Beans, Lettuce, Sun flowers, Snap dragons.

3.        Size of seed makes a difference, larger seeds can be easily pushed into the dirt to the right depth (as recommended on seed pack) and spacing is a little easier to determine. 
Smaller seed will need to be scattered and thinned out later.   

4.       Ground Planting - If you are planting in the ground -rake and loosen the soil, remove weeds.  To ensure success add a nutritious soil amendment such as Pefferlaw brand 3-way mix and rake into the top 3 inches of the soil.  Use our calculator on our website to see how much soil to purchase for the area you are planting. http://www.pefferlaw.com/calculator-online
Bigger seeds can be pressed in and covered, smaller seeds should be scattered, rake lightly to cover the seeds, and water with a gentle water stream like a watering can or the mist selection of the hose so as not to wash away the seeds.

5.       Planting Pots – I recommend pots for children because they represent a more confined area and are easier to focus on.  Weeding will not be as difficult if at all needed.  Use as many pots as selections of plant. Choose containers that have drainage and large enough for the plant to grow the season.  I would suggest pots that are at least 10” deep for successful healthy root growth. 
Choose a potting or container mix that has vermiculite or perlite and fertilizer included.  I suggest Pefferlaw Brand Hanging Basket & Planters Mix.
Press in larger seeds to the proper depth and cover with soil or scatter smaller seeds across the top of the soil. Sprinkle soil over top to cover the scattered seeds.  Water carefully with a light mist or watering system so as not to wash away the seeds.  Place in the sun, have your child water daily, preferably in the early morning or evening.

6.       Thinning out - When the seeds first germinate, you will notice two Primary leaves.  Do not attempt to thin out the plants until the first True leaves emerge.   True leaves are the second set of leaves to appear and are completely different than the primary leaves.  Once the true leaves are sprouted you can decide which plants stay and which go.  Pick the hardiest plants within a grouping.   Spacing will be determined by the type of plant and is generally listed on the back of the seed pack.
Thinning can be done by picking (traditionally done) or cutting with scissors (using scissors does not disturb the roots of the plants that are staying).

Continue to water plants weekly.  A more generous watering can takes place once the plants are large enough to endure.  Watering is generally best in the evening for sunny areas and in the morning for shady areas. 

For more ideas on Garden projects for the children – visit our website – garden tips.


Thanks so much for all those great tips, Susan!  I'm so looking forward doing some planting with my kids soon.

Don't forget to enter my giveaway.  Just click here to go directly to the post.

Happy Creating!