Friday, February 15, 2013

Cross Canada Blog Hop: It's All About the Layout

If you're here because you saw me on Durham Daytime yesterday and want instructions to make the banner, click here.

Welcome to another Cross Canada Blog Hop!  This month we're featuring 2-page layouts.  If you came from Carrie's blog, you're on the right track.  Feel free to click on at the bottom of each post until you get back here, or you can literally hop across Canada and start at Michelle's blog.  Now, on to my layout.

Have you seen the gorgeous new Workshop-on-the-Go kits in the new Idea Book?  They're stunning and I particularly enjoyed working with Chantilly.


My monthly scrapbooking club will be making this layout in April.  (If you're not a part of this group, you can still join!)  A lot of them have boys and this kit doesn't say "Perfect boy paper" to me.  I thought they'd appreciate seeing it from a new perspective.  So, I created this layout.


Girly paper, now perfect for my boy!  The backs of those pretty-in-pink papers are beautiful shades of blue, green and yellow.  Here are a couple pictures of the individual pages.


I love the look on Nathaniel's face in that middle photo!  So silly, he is.  Here are a couple shots of the embellishment clusters.


Did you catch that I even used the same sparkles on this layout?  All the same products, just with a masculine twist.


Here's what's all included in the kit.  Click here to check it out on my website and order your very own.

Thanks for popping in.  I'd love to hear what you think of my change up layout.  Now it's time to hop on over Sheri's blog and see what stunning layout she's created for your inspiration.

Happy Creating!

Thursday, February 14, 2013

Durham Daytime Love Banner

Happy Valentine's Day!  If you are visiting because you saw me on Durham Daytime this morning, welcome!  I'd love for you to leave a comment and let me know what you thought of my projects.  I thought it would be a nice idea to post the instructions for the banner we made.


It's super easy, so here we go.

I used my Cricut and the Close To My Heart Art Philosophy cartridge to cut the banner pieces.  If you don't have a Cricut, you can easily cut them by hand.  
I used Cricut Craft Room, so I'm not 100% sure what size you would set your dial to, but the base is 5" wide and the stamped triangle is about 4.5".  The base is cut from Hollyhock cardstock, the triangle is from Blush.


Sponge the edges of the Blush triangle with Hollyhock ink 
and your favourite distressing tool.


Stamp your chosen images in blush ink.  I used Card Chatter-Love and Love Life.


Attach your two pieces together.


Using dimensional adhesive, like 3-D Foam Tape or Pop Dots, attach your letters.


Attach your favourite ribbon to the top of each piece.  I used Glue Dots.


Gotta add some more bling!


Using mini clothes pins, attach your banner pieces to a strip of hemp or twine.  Be sure to leave enough on either end to hang up your lovely new banner!


I hope you see just how easy it is to add some fun decor to your home.  I also hope you'll check out more of my blog and sign up to get my posts in your inbox.  You'll find the sign up box at the top right.  Better yet, email me for more information on my classes and Close To My Heart products.  I'm looking forward to hearing from you!

Stay tuned, I'll be posting photos of the card we made in the second segment later.

Happy Creating!

Tuesday, February 12, 2013

CTMH: Capture The Love Moments

I had to share my favourite new product in the new Spring/Summer Idea Book.  It's perfect for this time of year, too!

Here it is:

This is the Workshop On The Go Canvas Art Kit.  It's beautiful and super easy to put together.  Everything you need is included except adhesive, blocks, and pigment ink.  The 12x12 canvas comes pre-printed to make it even quicker.  You'll want to have your Liquid Glass, Glue Dots and 3-D Foam Tape handy to put everything together.  An easy-to-follow, full-colour instruction brochure is included.  

Here are a couple of close ups of the fabulous accessories included:


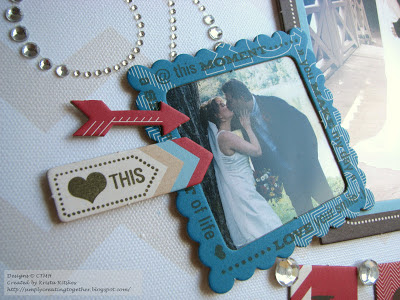
I loved going through my wedding photos to find the perfect ones for this project.  We're celebrating our 10th anniversary this August so I'm feeling sort of lovey-dovey lately.  (Grin!)

I hope you don't wait for Valentine's Day to celebrate the special people in your life.  Happy Creating!

Monday, February 11, 2013

Simon Says Stamps: Love Card

Valentine's Day is almost upon us.  Have you been crafting away, creating little treats for your kids to give out, decorations to put up in your home, or that something special for your honey?  I've been having some great fun creating.

I won a Simon Says Stamps Card Kit from my friend Sarah a while ago and have had some fun creating with it.


I used this card by Sam as my inspiration and almost did exactly what she did.  Sometimes you just love a card that much!

Here is my take:

The "with love" background is just strips of washi tape!  I love washi tape and this one was so perfect.  I only used items that were included with the card kit and it was great fun.  Here's a close up of all the layers.


Happy Creating!


Thursday, January 31, 2013

CTMH: February Stamp-of-the-Month Blog Hop

Welcome to another Stamp-of-the-Month Blog Hop!  If you've come from Vicki's blog, you're on the right track.

As consultants we are all very excited about the release of our new Spring/Summer 2013 Idea Book!  I'm sure you'll see lots of brand new product on the hop this month, including my post.  This month's stamp set has four images with lovely sentiments.  Here's what it looks like:


I used the current Retro Sketches sketch for my card.


Here's my card:

Instead of using the extra layer of paper, I drew a black line around the edges of the card.  And since I used this card base, I didn't really have room for the text on the right.  The hemp can be untied to open the card. Here's a closer look at that fabulous new hemp.


Products used:

Now it's time to hop on over to Lori's blog and check out what new (or not new) products she's used.

Happy Creating!

Friday, January 25, 2013

More Sneak Peeks!

Here we are again, as promised, more sneak peeks!

I've been working on some Workshop-on-the-Go kits because sometimes I just need to follow directions to get inspired to try my own thing.  I have to say that I am in LOVE with the new papers in the Spring/Summer Idea Book!  The accessories packages that go with the papers are amazing, and pretty much all of the WOTGs have them included.

Here's a look:


You'll have to come to my Launch Party to see the full projects, but I hope that gets you excited about what you can expect.  Just a week more and you'll be able to order gorgeous new paper, stamp sets, and accessories!  Or, if you want to see it all a day early, join me at my Launch Party on Thursday, January 31, 3-5pm or 7-9pm.  Just email me at simplycreating@hotmail.com to sign up no later than Wednesday.  You'll get a free Idea Book and get to create a fun little project with some new product.  Can't come but still want an Idea Book?  Just let me know and I'll make sure to get one to you.

Stay tuned here.  I hope to have more photos posted soon!
Happy Creating!

Friday, January 18, 2013

Christmas Wreath, Finally!

I mentioned it in a previous post, but I just have to shout it again.  I'M DONE!  I finally finished my Christmas wreath last weekend and I'm so excited!  I have been getting so many wonderfully encouraging comments about this project, I just can't wait to share.

I hung it up on my door and took some photos on our beautiful sunny winter afternoon ... and then just left it up.  Hee hee.  Yes, Christmas is over and most of our decorations are put away, but my wreath is beginning its display time.  :)  Here is a photo of what it looks like on our door.


Here's a better view of the wreath.


Do you recognize some of those medallions (or yo-yos as some people call them)?  I posted the beginning of this project last month.  You can see that post here.  Here are a couple close ups.


If you know me, you know that the burlap ribbon was my favourite new product in the Autumn/Winter Idea Book.  I just doubled it up before tying the bow, made it much fuller and more pretty.


This banner was cut with Art Philosophy, twice (once in patterned paper and once in Cocoa) to make it sturdier. The letters were also cut on the Cricut, but I can't remember which cartridge, I looked at quite a few of other people's before deciding on these.  I used Cocoa brads to anchor the white hemp and then glued it to the base.  The base!  I need to tell you what I used.  When consultants order bulk paper, there's a sheet of cardboard in the package.  I used two of them, cut the circle shape out, and glued them together with Liquid Glass.  I'm sure you're not really supposed to see the hook when you hang a wreath on one of these hangers, but that's the way it turned out for me.  I used a piece of burlap, stuck to a piece of leftover cardboard with brads and then Liquid Glassed to the back to create a spot for the hook.

The medallions, if you remember, were all cut on the Artiste cartridge.  I have only used Pear & Partridge paper along with a bit of Cocoa cardstock.  I added some Glitz Gel to some of them, either Bronze or Red, along with Wooden buttons and other bling from various Close To My Heart packages.

I absolutely love it!  And I'm so happy to finally have some papercrafting goodness gracing our front door.  

Thanks for dropping in.  Happy Creating!