Tuesday, May 7, 2013

Atlantic Hearts Sketch Challenge: Bee Yourself


If you're visiting my blog because you saw me on daytime Durham, and are looking for the Sprouting Card instructions, just scroll down.

It's a busy day on my blog today!  I hope this sudden influx of posts doesn't knock you over.  :)

I'm participating in another Atlantic Hearts Sketch Challenge.  It's a brand new sketch challenge blog.  Go check it out!  Here is this week's sketch:

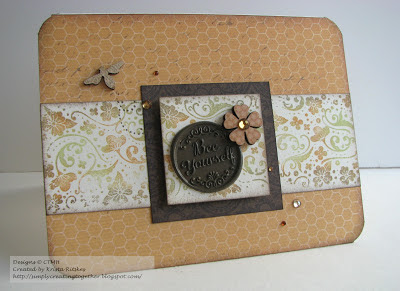
And here is my take on it:


I had fun with this sketch and gave myself another challenge as well.  I had these supplies out to prep for my sprouting card and told myself I was only allowed to use those.  I did pull out the In The Background stamp set as well.  The main image across the card has been sponged in different places with daubers, then I huffed on it to make the ink nice and juicy again before I stamped.  I trimmed out the middle section to pop up and added some embellishments.  Here's a close up of the middle:


Here are the supplies I used:


Don't forget to enter my draw for a card kit, soil pack and stamp.  Enter here.

Happy Creating!


Planting Your Sprouting Card with Pefferlaw, and a Giveaway!

Here's another quick shot of the sprouting card I posted earlier today:

The next question I'm sure you're asking is, "How do I plant those seeds?"  You want your recipient to enjoy the blooms you've given them.

For that, I turned to Pefferlaw Potting and Seeding Mix.


This soil is fabulous!  It's certified organic so it's perfectly safe to have your kids join you as you play in your garden.  This soil is safe and free from contaminants.  It looks so rich and dark and full of good things for your plants.


Now, I should just say right now, that I am not a gardener.  I don't know much about taking care of a garden or how to prune or deadhead just right, or even when to do it, but I did enjoy getting my fingers dirty to plant my little pot of flowers.  I'm looking forward to planting even more seeds with my kids.


I made up a test tulip with Shasta Daisy seeds (I LOVE Shasta Daisies!) and planted it in a special pot.  I did trim away some of the extra paper as you can see above.  I have since learned that it would probably be better to scrape the seeds off the cardstock and plant them that way. Susan, from Pefferlaw, has told me they'll germinate better.


Here's my seed tulip all planted in that special pot, painted by my daughter when she was about 5, I think.  I love it.  It makes the perfect gift to go along with your sprouting card.  It's only been a couple weeks, but my seeds are sprouting away and my kids are so excited watching them grow!  I'll post a photo later to show you, and I'll be following Susan's advice in my next post about how to best take care of those new seedlings.

Let's get to that giveaway.  The winners of this contest will receive a special card kit, similar (but not exactly the same) to the one I made.  It will include pre-cut papers, embellishments, and stamped images, as well as a small bag of Pefferlaw Potting and Seeding Mix!  I might even throw in a cute little stamp.  Did you notice that I said winners?  I'll be giving away three prize packs!  And, on top of that, the winners will get a chance to showcase the card they made with their prize here on my blog.  I can't wait to see what they make!  Maybe you'll be one of them.  Make sure you spread the news and earn as many entries as possible.

In order to use Rafflecopter, you must create an account.  Once you login, you'll be able to enter.  Follow the instructions connected with each option.


If you make a sprouting card, I'd love to see it.  Post a link to your card in the comments.  I just might showcase it as well.

Happy Creating!


Sprouting Mother's Day Card

Welcome to another Mother's Day project!  This one is super fun and you can even get the kids involved.  If you're here because you saw me on daytime Durham, an extra special welcome to you.  :)

Here is the project I made with Dena this morning:


The card itself is fairly basic.  Just pick a sketch or design you like and create the front as you like.  Make sure to leave a good spot for the sprouting image.  I'll list the materials I used for this particular card at the end of the post.  

Here are the instructions for creating the sprouting part of your card:

1. Cut an image from a piece of cardstock.  I used a my Cricut, but you could draw an image and cut it with a craft knife.  You want the negative part of the image to use as a stencil.  Clip it to the cardstock you'll use for your card. 

2. Take equal parts of flour and sugar.  I used a tablespoon in these photos, but discovered it was way too much for one card.  Just make sure to use equal parts.  Start adding little bits of water, stirring with a paintbrush. 

Your paste should eventually look like the photo below. 

3. Paint your paste onto your cardstock 

4. Remove the stencil and sprinkle your seeds onto the paste, pressing them down as needed.  I used a mixture of all-purpose wild flower seeds.  I looked for ones with a short germinating time and that are planted in a random matter. 

I also found that some seed packages don't have quite this many seeds.  You can play with it.  Try some herb seeds even!  I'm not a gardener-in-the-know, so I went to Walmart and felt the packages for all sorts of flowers.  I was just looking for small seeds!

So, now I'm sure you're wondering, how do I get this on my card???  I used clear photo corners, as shown in the photo below:

I also made sure that my embellishments were not attached on top of the sprouting card piece.  

You'll also want to make sure you decorate underneath so that there's something pretty to look at when your recipient plants her seeds.  Here's what I did:


Here are the products I used:


And there you have a beautiful Mother's Day card that can bring lasting memories and joy.  Stay tuned, I'll have lots of gardening tips and instructions on how your recipient should plant those seeds in my next post later today.  And details for an exciting giveaway!

Happy Creating!

Small print: Instructions for the sprouting card was taken from Garden Crafts for Children by Dawn Isaac.


Monday, May 6, 2013

Monogram Winner!


Thank you to everyone who played along!  Congratulations to ...

Barbara Anderson Wagar! 

I've sent her an email to let her know so she can choose her two stamps.

Stay tuned for another really fun giveaway...

Sunday, May 5, 2013

Atlantic Hearts Sketch Challenge: Quick Mother's Day Card

I'd been thinking of entering this sketch challenge as soon as it was posted on Monday, but I had a big surprise party to plan for my hubby, my little buddy got sick, and I have another appearance on daytime Durham on Tuesday to prep for.  But this afternoon I decided a half hour before supper to make a card anyway!

Atlantic Hearts is a brand new sketch challenge blog and it's all Canadian!  That doesn't mean you have to be Canadian to enter, though.  Make sure to go check out the other entries.

Here's the sketch:

Here's my card:


I was working with Claire and had a bunch of scraps on my desk, so I used those.  I glued all the strips, except the bottom one onto a piece of 4x4 cardstock, then sponged around the edges.  Then I tied a on a piece of Baker's Twine.  You can't really see it in the photo, but this panel is popped up.  I sponged the bottom piece, gluing it directly to my card front and stamping my sentiment in Outdoor Denim.  I added some Sparkles and I was done!  I chose to do a Mother's Day card because of the project I was working on before I made this card.  But you'll have to wait to see it.  ;)

Don't forget, I'm giving away 2 Monogram Stamp sets of your choice.  Just scroll down to the post below to enter!  Contest closes at midnight EST.

Happy Creating!

Thursday, May 2, 2013

Monogram Giveaway!

What a day I'm having!  It started with my son getting a nasty cold, with a lovely sleep-interrupting cough.  He's staying home from school today.  Then, the main highway was shut down because of an accident, so all that rush hour traffic drove on city streets, right on my route to drop my daughter off at school.  A drive that normally takes just 10 to 15 minutes, took me over an hour!  NOT a fun way to start the day.  I'm trying to get the house cleaned up and laundry done as quickly as possible because I have to leave at 4:45 for the night, and well, with a sick little boy at home, that's not always the easiest.  So, why am I telling you all of this?  Because I decided that I was going to make this day better, by doing a giveaway!  I'm going to try using Rafflecopter for the first time.

 What do you win?  You will receive your choice of two, yup, TWO monogram stamps.


Here's a video to explain just how great these stamps are.


Just follow the instructions on the Rafflecopter below and get ready to win!  Draw ends on Sunday at midnight.


Good luck and Happy Creating!


Wednesday, April 24, 2013

Using up the Old, Quick and Easy and Flat(?)

I realized recently that I didn't have many birthday cards in my stash.  I have made some lovely ones, but they were very bulky and would have cost quite a bit to mail and required a special envelope, etc, etc.  So I made a goal for myself: Use up some old product and make "mailable" birthday cards!  Over the next few posts, I'll share the cards I made with you.  Here are the first ones:


These first two use the retired Miracle paper, Stickese, and Kraft borders.  I've also added some Sparkles and some embellishment with a Pearl Pen.


These two are made with Mischief paper, Felt Shapes, Mayberry paper and Stickese, and some more Sparkles.


This last one is from a promotion way back in my first year as a consultant, I think, called Seredipity.  I added a couple Sparkles as well.

It's fun to add lots of dimension to our cards, with all kinds of layers and rolled flowers and all sorts of other goodies, but sometimes you need to simplify.  I'm quite pleased with how these turned out and they went together very quickly.

Stay tuned for more "mailable" cards.  Happy Creating!