Showing posts with label home decor. Show all posts

Tuesday, August 12, 2014

Workshop: Be Thankful Box with Journaling Cards


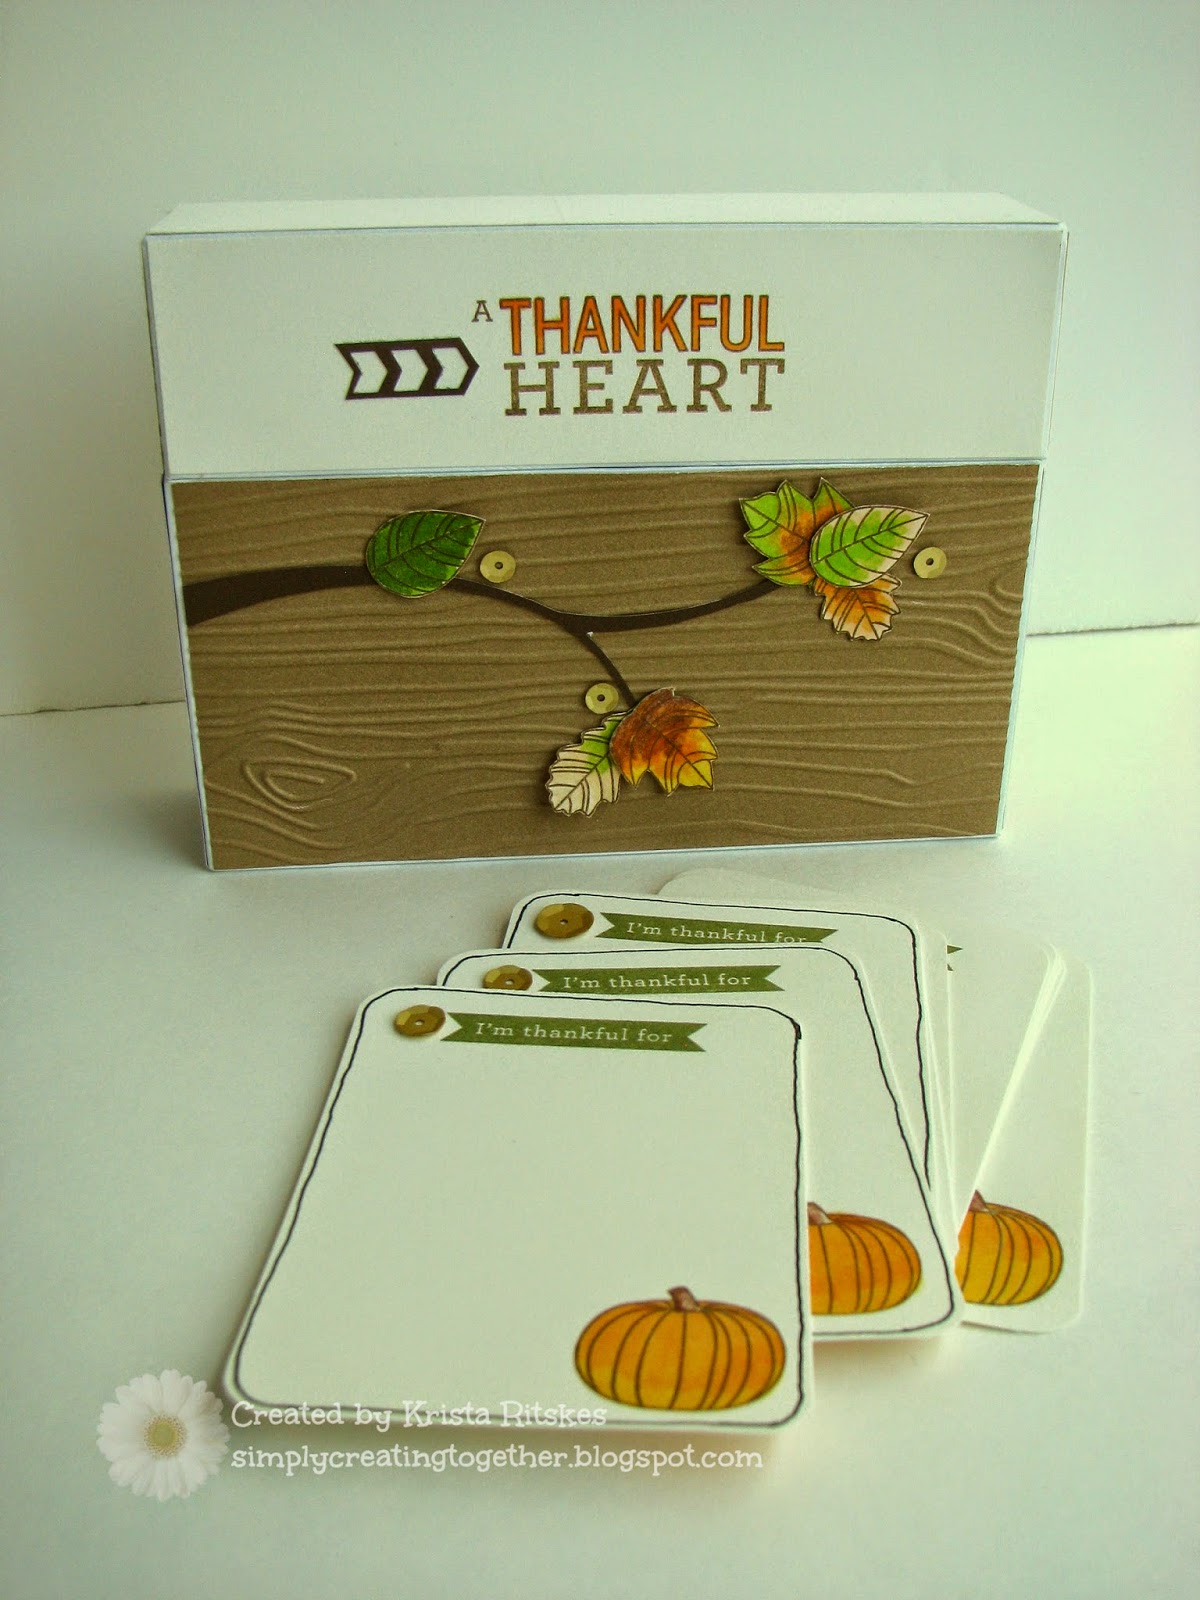
I'm looking forward to my next workshop, even though we haven't had my August one yet!  On Friday, September 19, at either 9:30am or 7pm, you can join me to create this Be Thankful Box with Journaling Cards.

This little box will help you and your family focus on being thankful this holiday season.  (Personally, I can't wait to see what my kids write down!)  I plan to use this for years to come, since there is lots of room in the box for more than the 12 cards we will make.

You'll get to play with a new embossing folder as well as our new ShinHan markers.  (They are SO great!)

Here are your kit options:

Basic Kit   $15:
Journaling Box
Sequins, Gold Assortment

Basic plus Stamp Set    $28:
Basic Kit
Thankful Heart

Basic plus 2 Markers   $31:
Basic Kit
Golden Yellow marker
Marigold marker

Basic plus Stamp Set and Markers   $44:
Basic Kit
Thankful Heart
Golden Yellow Marker
Marigold Marker

All papers needed will be pre-cut for you, like all my other workshops.

Email or call me to claim your spot, or if you'd like to create at home, just add $5 to your total.

Sunday, August 10, 2014

Brae-er's Blog Hop: Some of My Favourite Things

I am joining another Brae-er Team Blog Hop!  You should have arrived here from Carol's blog.  If you're starting here, just keep hopping until you get back.

This month's hop is all about our new favourite products.  I've been really enjoying the five new colours Close To My Heart introduced with the Annual Inpsirations catalogue.  They're beautifully soft, but not just pastel soft.  They're modern and a lot of fun to work with.  I also love the new Designer Creation collection of party favour items and such.  These paper bags are so cute!  I stamped some images with Have a Happy Day stamp set, trimmed them out and popped them with our two different heights.  Then I added some Gold Bling Gems.


Here's a close up.  You can see the two different heights here. (Full recipe below.)


I also made a card, one that came out of my own head (no, that doesn't happen often!) and I absolutely love it!


The background is from the Basic Paper Fundamentals (we now have them in ALL our colours).  I added new Thistle and Slate ribbon and sponged with Whisper ink.  Those stars are also new, but they only come in white, so I used our new ShinHan markers to colour them!


Now, hop on over to Heather's blog to see what her favourite new products are.

Items used:


Friday, April 11, 2014

Cricut Crafts for Kids

How's that for alliteration?  :)

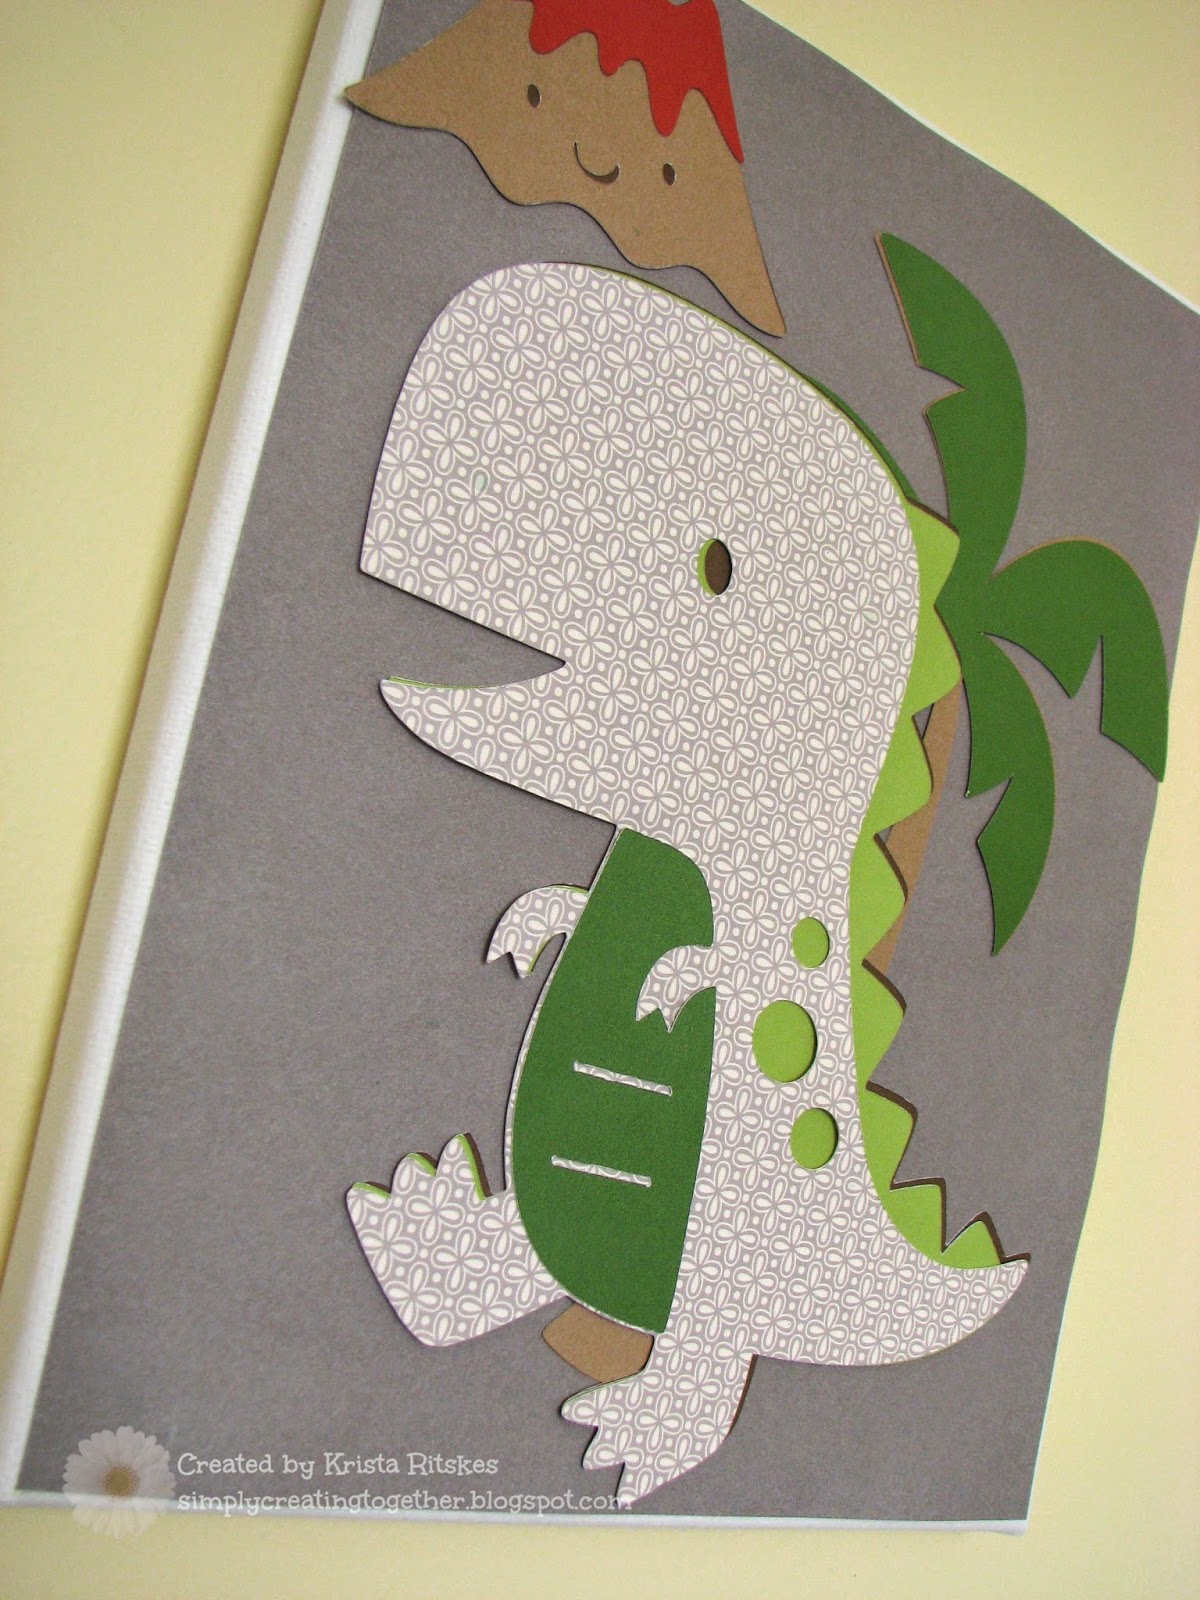
I had so much fun planning this project with Nathaniel.  Arianna already has a canvas in her room, made during her birthday party last year, so it was Nathaniel's turn to create a fun picture to hang on his wall.  This is the canvas the kids were working on during our March Break TV segment on Rogers.  Check it out here.


All the images were cut with the Create-a-Critter cartridge.  In this next photo you can see how it was attached to an 8x10 canvas.


All the papers we used were Nathaniel's choices.  He asked for particular colours and I gave him options.  In fact, I had a different idea for the colours, but I love how it turned out.  The patterned grey is from the Babycakes paper packet.  Then we used some Chocolate, Sweet Leaf, Topiary, Cranberry, Slate and Desert Sand cardstock.  He and Arianna put it all together and I used Liquid Glass to put it on the canvas.  It totally suits my dino-loving boy and it was so very easy!

Canvas multi-packs are on sale at Michaels this week, at least here in Canada, so it's the perfect time to stock up!

Happy Creating.

Monday, April 15, 2013

Cross Canada Hop: Home Decor

Welcome to another Cross Canada Blog Hop!  We're excited to show you some fun home decor this month.  If you arrived from Arlene's blog, you're on the right track.  Remember that this is a cyclical hop, so just keep hopping until you get back to where you started.  If you would like to literally "hop across Canada" you can click here to start at Michelle's blog.  She also has a complete list of hoppers in case you get lost along the way.

Using papercrafting as a way to add to your home's decor is super popular right now.  If you follow my blog, you've seen quite a few of these types of projects lately!  I just love it.  My love of paper, stamps and embellishments is creeping out of my scrapbooks and off my cards into my home and it makes me smile every time I look at them.

The project I chose to showcase today isn't a new one.  If you've been in my basement studio, you've probably seen it.  I created it about a year ago, but realized I never posted about it on my blog.  So, it seemed like the perfect choice for this hop.  Here it is:


I've made three of these topiaries now, all different styles.  You can see my first one here.  It takes a lot of time, but the finished project is well worth the effort.  The rolled flowers are all cut on the Cricut, with the Art Philosophy cartridge (Font function, shift, Tag5 key) at 4".  I used only Wonderland paper and Moonstruck cardstock (both retired).  Here's a close up:


I used Liquid Glass on the rolled flowers, but have since started using a hot glue gun.  It goes a lot quicker.  After they were dry I pinned them with regular pearl-topped pins right into a styrofoam ball.  The wooden dowel was stuck in after all the flowers were added. I didn't even add hot glue to keep it in place.  This way I can take this project to other places by just popping the top off!  The dowel is stuck into some green floral foam in the bucket, which I bought at Michaels.  I added some hot glue in the bucket before covering the whole thing with rocks from Dollarama.  To finish it off, I used some ribbon from the Blue Designer Ribbon collection (also retired) to tie a bow.

This now sits proudly on my shelf in my studio.  Want to make one of these, but don't have a Cricut?  The post with my first topiary includes instructions on cutting these flowers by hand.

Now it's time to hop on over to Sheri's blog and check out what she's created.  Happy Creating!


Tuesday, April 2, 2013

Paper Rose and Burlap Wreath

Wow, did I ever love making this wreath!  As I said on daytime Durham, I'm really starting to enjoy making Home Decor with my paper supplies.  If you've been following my blog for a while, you also know that I adore burlap, so when I saw some burlap wreaths on Pinterest I knew I just had to make one.

Here it is, hanging on my door.  (I finally took down my Christmas one!)


I used a wreath form and a roll of burlap from Michaels.  I love the smell of the burlap!  The roses are all cut from the Artiste cartridge, Key F, Accent 2.  The two biggest flowers are cut at the largest possible size.  Love rolling BIG flowers.  The smaller ones are cut from Chantilly paper, at various sizes.  I also used Blush, Buttercup and Cotton Candy cardstock.  For this time, I glued the flowers together using a hot glue gun so it went pretty quick.  Here's a close up of the flowers:


Inside the big flowers I added some pearl opaques as well as pearl badge buttons.


After the flowers were hot glued on, I wrapped some Sweet Leaf Grosgrain ribbon around the top a couple times, tied a bow and added some more hot glue.  My glue gun is getting a workout!

I hope this project gets you in a springy mood.  It's definitely beginning to look and feel like spring here and that makes me happy.

Happy Creating!

Sunday, March 31, 2013

CTMH Stamp-of-the-Month Blog Hop

Hello everyone!  Happy Easter, again.  I hope you're having a wonderful weekend with family like we are.  If you came from Mary's blog, you're on the right track.  If this is your first stop, then just keep hopping until you get back here and you will have feasted your eyes on every bit of loveliness the CTMH consultants have created for your inspiration.

The stamp set we're spotlighting this month is called My Sunshine and as soon as I saw it, I fell in love!


Isn't it adorable?  Those red lines around some of the images mean they can be cut on Cricut, with our Artiste cartridge.  Here is my project:


If it looks familiar, it's because I just used this same frame for an Easter project.  I just swapped out all the bits and created this fun summery frame.  To stamp the balloon, I used sponge daubers to ink up the image with Lagoon, Sunset and Honey ink.  The sun is stamped with Honey as well, the centre being done with a second generation technique.  The sentiment is in Black Archival ink.  The balloon was cut from Lagoon cardstock at the suggested size, 2 3/4".  Then I cut it again from White Daisy, at 2 1/2" and stamped it so there would be no white edge.  I used Lagoon, Black and White Daisy cardstock.  Here's a close up of all the layers:


Now, it's time to hop on over to Traci's blog and discover another way to use this stamp set.  I'd love to see what you create with this set over the month.  

Happy Creating!


Saturday, March 30, 2013

Happy Easter! He is Risen Frame

I want to take some time to wish everyone a very Happy Easter!  I don't know what your long weekend is like, but here in Ontario, we not only get Good Friday off school, but we also get Monday off.  My hubby is off as well, which makes a perfect 4-day weekend.  It means we've done lots of visiting family and enjoyed some yummy meals, but we've also had a chance to celebrate in special ways, with two church services.

This holiday is super special to me; the time we spend thinking about Jesus' sacrifice on the cross is always an emotional time for me.  Yup, I'm often in tears during our Good Friday service.  But, it's also so exciting when we get to rejoice in His resurrection on Sunday morning!  Sunday morning, I'll have the privilege to participate in an Expressive Arts presentation.  We'll do some really neat moves/sign language/liturgical dance to this song, I Am, by Eddie James.


Such a powerful song and I have so much fun being a part of this group.  It's something I get to do more often.  Bet you didn't know that about me.  ;)

I know, you want to get to the artwork.  If you follow my Facebook page, you've already seen this.


I loved the layers in this frame I bought at Dollarama.  Stay tuned.  My next post, for the Stamp-of-the-Month Blog Hop uses this frame, too!

Products used:
White Daisy, Smokey Plum, Ruby cardstock
Archival Black ink pad
Gold embossing powder
Versamark ink

Happy Easter and Happy Creating!

Wednesday, March 27, 2013

Easter Basket

Hello!  Welcome to my blog.  If you're here because you saw my segment on daytime Durham yesterday, you're in the right spot.  Here is the project we made on the show:


I had so much fun coming up with a quick and easy project to complete on air.  When I need quick and easy, I go to my Cricut.  Every piece for this little basket was cut with the Artiste and Art Philosophy cartridges.  Here are the instructions:

1.  Cut the basket, using Buttercup cardstock.  Use the Artiste cartridge, page 73.  3-D creative function, Spring/Easter key, at 2 1/4".
2.  Cut the handle, using a piece of patterned paper.  (I used Chantilly.)  Use Shift, and the same key and function, at 2 1/4" as well.
3.  Cut the grass, using green patterned paper.  Use Accent 3 function, Shift, same key, Fit to Length mode, at 11".  
4.  Cut the tag, using cardstock.  Use the Art Philosophy cartridge, page 39. Use Shift, Tag function, key, at 2 1/4".
5.  Assemble the box following the instructions in the provided booklet.
6.  Adhere the grass, but just applying adhesive to the very bottom.  You can use your finger to curl the tips out a bit.
7.  Attach the handle with two brads the same colour.
8.  Stamp your sentiment on the tag.  I used Twilight ink.
9.  Tie your tag onto the handle using Baker's Twine.  I used Smoothie.
10.  Fill with some sweet grass and yummy treats!

Here's another look.


If you make something like this, let me know by posting your link in the comments.  I'd love to see it!  Stay tuned, because I'll be posting photos of my paper rose wreath soon.

Happy Creating!

Friday, March 15, 2013

Cross Canada Blog Hop: Hinged Display Tray

Welcome to another Cross Canada Blog Hop!  This month we are focusing on the Hinged Display Tray.
This Display Tray is a 5x7 fold out wooden tray with divided sections.  You can get a closer look at it on page 125 of the 2013 Spring/Summer Idea Book.  It sells for $18.95.  Talk to your CTMH consultant to order your's, but if you don't have a consultant you can click on over to my website to get your hands on one.

If you came from Michelle's blog, you're on the right track.  This is a circular hop, so just keep hopping through until you get back here, or, you can hop across Canada and start at Michelle's blog.

Here is what I did with this display tray.


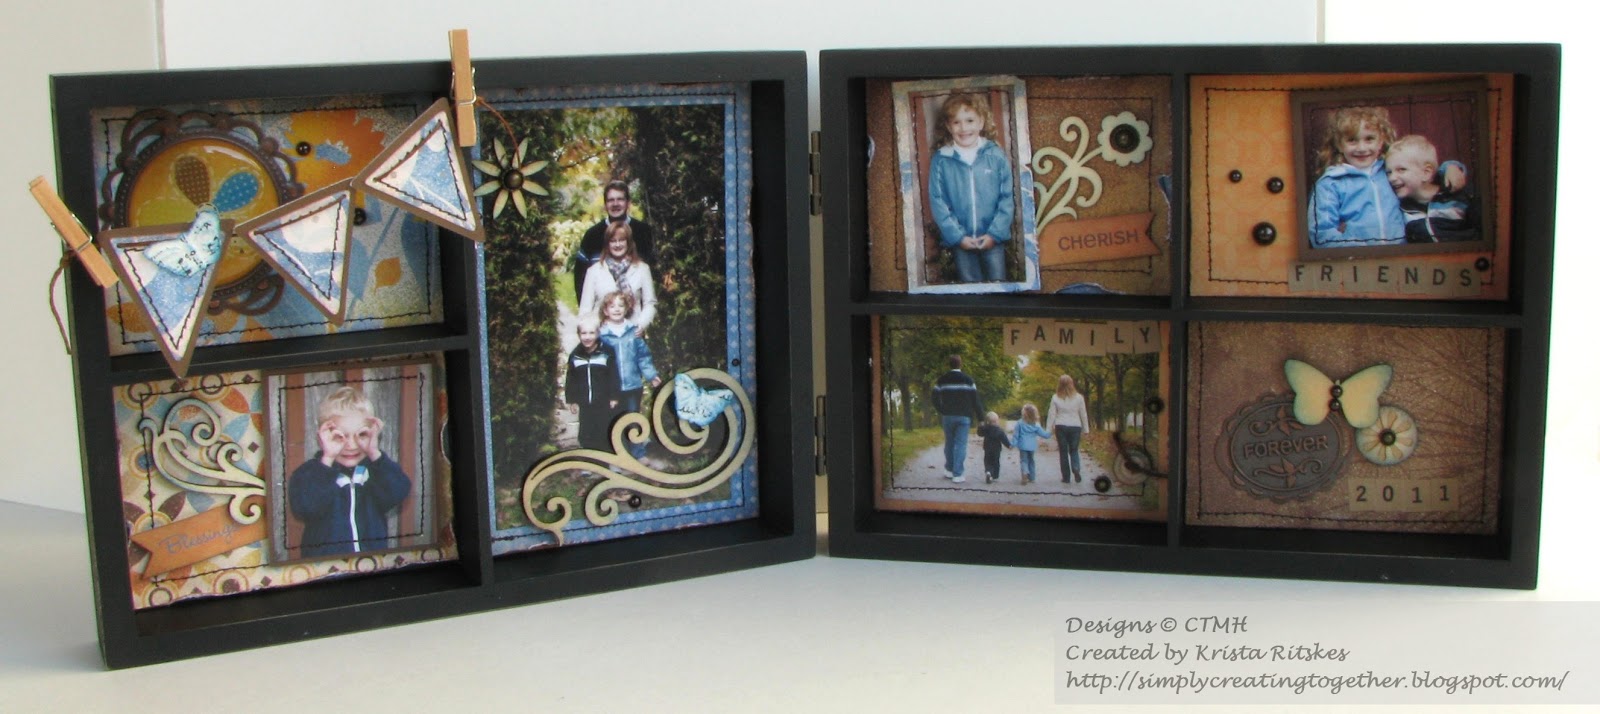
To be honest, I was a little intimidated by this product.  I wasn't sure what to do with it.  It was so nice looking, I wasn't sure I could use it properly, but when the choice was made to use this tray for the hop, I took it as a challenge and jumped in with both feet.  These photos were taken over a year ago, but I still love creating with them.  They've made it on to some layouts already, but those will be hidden in albums, so I decided to use them for permanent display.  I had a very different plan when I started, but as I started working, I made small changes (and some big ones) to my plan.  I even ended up flipping the whole thing around, but I love how it turned out!

Here are close ups of each side.  There is no stamping in this project.  I only used ink on the edges of papers and on the wooden embellishments. 


Materials used:
Dreamin' paper pack (retired)
Mini-Medley Accents, Wooden
Mini Clothes Pins
Opaques Mocha
Durables Artisan Studs
Colour-Ready Garden wooden shapes
Chocolate Waxy Flax
Harvest Charms (retired)
Keyboard Kraft Alphabet
sponge
3-D Foam Tape
Liquid Glass
Machine stitching

Now it's time to hop on over to Michelle M's blog.  If you get lost along the way, you can go back to Michelle's blog for a complete list.  Enjoy!  Join us next month for a focus on Home Decor.

Happy Creating!


Thursday, February 14, 2013

Durham Daytime Love Banner

Happy Valentine's Day!  If you are visiting because you saw me on Durham Daytime this morning, welcome!  I'd love for you to leave a comment and let me know what you thought of my projects.  I thought it would be a nice idea to post the instructions for the banner we made.


It's super easy, so here we go.

I used my Cricut and the Close To My Heart Art Philosophy cartridge to cut the banner pieces.  If you don't have a Cricut, you can easily cut them by hand.  
I used Cricut Craft Room, so I'm not 100% sure what size you would set your dial to, but the base is 5" wide and the stamped triangle is about 4.5".  The base is cut from Hollyhock cardstock, the triangle is from Blush.


Sponge the edges of the Blush triangle with Hollyhock ink 
and your favourite distressing tool.


Stamp your chosen images in blush ink.  I used Card Chatter-Love and Love Life.


Attach your two pieces together.


Using dimensional adhesive, like 3-D Foam Tape or Pop Dots, attach your letters.


Attach your favourite ribbon to the top of each piece.  I used Glue Dots.


Gotta add some more bling!


Using mini clothes pins, attach your banner pieces to a strip of hemp or twine.  Be sure to leave enough on either end to hang up your lovely new banner!


I hope you see just how easy it is to add some fun decor to your home.  I also hope you'll check out more of my blog and sign up to get my posts in your inbox.  You'll find the sign up box at the top right.  Better yet, email me for more information on my classes and Close To My Heart products.  I'm looking forward to hearing from you!

Stay tuned, I'll be posting photos of the card we made in the second segment later.

Happy Creating!

Tuesday, February 12, 2013

CTMH: Capture The Love Moments

I had to share my favourite new product in the new Spring/Summer Idea Book.  It's perfect for this time of year, too!

Here it is:

This is the Workshop On The Go Canvas Art Kit.  It's beautiful and super easy to put together.  Everything you need is included except adhesive, blocks, and pigment ink.  The 12x12 canvas comes pre-printed to make it even quicker.  You'll want to have your Liquid Glass, Glue Dots and 3-D Foam Tape handy to put everything together.  An easy-to-follow, full-colour instruction brochure is included.  

Here are a couple of close ups of the fabulous accessories included:


I loved going through my wedding photos to find the perfect ones for this project.  We're celebrating our 10th anniversary this August so I'm feeling sort of lovey-dovey lately.  (Grin!)

I hope you don't wait for Valentine's Day to celebrate the special people in your life.  Happy Creating!

Friday, January 18, 2013

Christmas Wreath, Finally!

I mentioned it in a previous post, but I just have to shout it again.  I'M DONE!  I finally finished my Christmas wreath last weekend and I'm so excited!  I have been getting so many wonderfully encouraging comments about this project, I just can't wait to share.

I hung it up on my door and took some photos on our beautiful sunny winter afternoon ... and then just left it up.  Hee hee.  Yes, Christmas is over and most of our decorations are put away, but my wreath is beginning its display time.  :)  Here is a photo of what it looks like on our door.


Here's a better view of the wreath.


Do you recognize some of those medallions (or yo-yos as some people call them)?  I posted the beginning of this project last month.  You can see that post here.  Here are a couple close ups.


If you know me, you know that the burlap ribbon was my favourite new product in the Autumn/Winter Idea Book.  I just doubled it up before tying the bow, made it much fuller and more pretty.


This banner was cut with Art Philosophy, twice (once in patterned paper and once in Cocoa) to make it sturdier. The letters were also cut on the Cricut, but I can't remember which cartridge, I looked at quite a few of other people's before deciding on these.  I used Cocoa brads to anchor the white hemp and then glued it to the base.  The base!  I need to tell you what I used.  When consultants order bulk paper, there's a sheet of cardboard in the package.  I used two of them, cut the circle shape out, and glued them together with Liquid Glass.  I'm sure you're not really supposed to see the hook when you hang a wreath on one of these hangers, but that's the way it turned out for me.  I used a piece of burlap, stuck to a piece of leftover cardboard with brads and then Liquid Glassed to the back to create a spot for the hook.

The medallions, if you remember, were all cut on the Artiste cartridge.  I have only used Pear & Partridge paper along with a bit of Cocoa cardstock.  I added some Glitz Gel to some of them, either Bronze or Red, along with Wooden buttons and other bling from various Close To My Heart packages.

I absolutely love it!  And I'm so happy to finally have some papercrafting goodness gracing our front door.  

Thanks for dropping in.  Happy Creating!

Wednesday, January 16, 2013

CTMH Sneak Peeks Part Two!

There are some beautiful new papers in our Spring/Summer Idea Book!  I'm sure you're just itching to see them.  So, here are some quick photos of each new paper packet.

Buzz and Bumble

For Always 

Chantilly

Claire

Tommy

Later Sk8r

 Surf's Up

Which one do you think is my favourite?  Which one is yours?  I'd love to hear.
More to come...

Happy Creating!